
❓ What Is This
There are many different design models you can use when building software.
This time, to get a basic feel for the MVC model — one of the most fundamental and common patterns in backend development —
we'll build a simple memo app.
This article uses Laravel.
If you haven't gotten Hello World working yet, take care of that first.
How to Run Laravel's Hello World on an M1 Mac
The 🐏 sections on this page are side notes. Feel free to skip them.
Here's what we'll end up with.
This article doesn't cover styling or anything like that.
The goal is just to get something working within an hour.
🪴 Environment
Some parts of this article are written specifically for Apple Silicon (related to Docker).
Please keep that in mind.
- Apple m1 MacBook Air
- 14.5 (23F79)
🔧 How To Do It
MVC (Model-View-Controller) is one of the fundamental principles of software design.
It splits an application's structure into
- Model
- View
- Controller
these three parts, which improves maintainability and readability.
🐳 Initial Setup
This covers setup on Apple m1.
It's mainly about Docker-related operations.
Here's the docker-compose.yml I used.
version: '3.8'
services:
  app:
    build:
      context: .
      dockerfile: Dockerfile
    image: laravel-app
    container_name: laravel-app
    restart: unless-stopped
    working_dir: /var/www
    volumes:
      - .:/var/www
    networks:
      - laravel
    environment:
      - DB_CONNECTION=mysql
      - DB_HOST=db
      - DB_PORT=3306
      - DB_DATABASE=your_database_name
      - DB_USERNAME=your_database_user
      - DB_PASSWORD=your_database_password

  webserver:
    image: arm64v8/nginx:alpine
    container_name: webserver
    restart: unless-stopped
    ports:
      - "8000:80"
    volumes:
      - .:/var/www
      - ./nginx.conf:/etc/nginx/conf.d/default.conf
    networks:
      - laravel

  db:
    image: arm64v8/mariadb:10.5
    container_name: db
    restart: unless-stopped
    environment:
      - MYSQL_ROOT_PASSWORD=root_password
      - MYSQL_DATABASE=your_database_name
      - MYSQL_USER=your_database_user
      - MYSQL_PASSWORD=your_database_password
    volumes:
      - dbdata:/var/lib/mysql
    ports:
      - "3306:3306"
    networks:
      - laravel

volumes:
  dbdata:

networks:
  laravel:
    driver: bridge
Add the following to your .env file.
DB_CONNECTION=mysql
DB_HOST=mysql
DB_PORT=3306
DB_DATABASE=your_database_name
DB_USERNAME=your_database_user
DB_PASSWORD=your_database_password
Start the containers, then access the container.
docker-compose up -d
docker-compose exec app bash
Run migrate, then exit.
php artisan migrateCreating a Migration File
In Laravel, migration files are used to define changes to the database schema (schema simply meaning its structure).
Migration files use PHP code to describe adding, removing, or changing database tables and columns.
Generate a new migration file in the database/migrations directory.
This creates a table called notes.
After running it, you should see a file like database/migrations/xxxx_create_notes_table.php (xxxx will contain a timestamp or similar).
php artisan make:migration create_notes_table --create=notes🐏 What Is php artisan?
- command: the command to run (e.g., make:migration, serve, migrate, etc.)
- options: flags you can specify (e.g., –force, –quiet, etc.)
- arguments: arguments passed to the command (e.g., the migration name, etc.)
php artisan [command] [options] [arguments]create_notes_table.php
Add the following inside function up().
The up() method
This runs when the migration is applied.
In this example, it creates the notes table
and defines the columns
id, title, content, timestamps.
The down() method
This runs when the migration is rolled back.
In this example, it drops the notes table.
A rollback means reverting a database migration — specifically, undoing an applied migration and returning to the previous state.
<?php

use Illuminate\Database\Migrations\Migration;
use Illuminate\Database\Schema\Blueprint;
use Illuminate\Support\Facades\Schema;

return new class extends Migration
{
    /**
     * Run the migrations.
     */
    public function up(): void
    {
        Schema::create('notes', function (Blueprint $table) {
            $table->id();
            $table->string('title');
            $table->text('content');
            $table->timestamps();
        });
    }

    /**
     * Reverse the migrations.
     */
    public function down(): void
    {
        Schema::dropIfExists('notes');
    }
};
Run the migration.
This command executes the up() method from the code above.
php artisan migrate📦 MODEL
Creating the Memo Model
The model handles interaction with the database and implements data validation.
In our memo app, that's the Note model. The Note model manages the memo data (title and content).
Creating the memo model
php artisan make:model NoteWrite the following code in Note.php inside models.
use HasFactory;
This enables Laravel's factory feature.
protected $fillable = [‘title’, ‘content’];:
Specifies which attributes are allowed for mass assignment.
Mass assignment means assigning values to multiple model attributes at once from an array or object.
<?php

namespace App\Models;

use Illuminate\Database\Eloquent\Factories\HasFactory;
use Illuminate\Database\Eloquent\Model;

class Note extends Model
{
    use HasFactory;

    /**
     * The attributes that are mass assignable.
     *
     * @var array
     */
    protected $fillable = [
        'title',
        'content',
    ];
}
🐏 What Does use HasFactory; Mean?
A factory is a feature that uses the ストデータを作成するクラスであるFactory class to generate random data for a database table.
🎮 CONTROLLER
Creating the Controller
The controller coordinates the model and view based on user input.
It receives requests, calls the appropriate model and view, and returns a response.
In our memo app, that's NoteController.
NoteController handles the logic for creating, viewing, editing, and deleting memos.
Creating the memo controller
php artisan make:controller NoteController --resourceAdd the following code to app/Http/Controllers/NoteController.php.
Each method handles a specific action (index, create, store, show, edit, update, destroy).
It processes the request and returns the appropriate view.
$request->validate([
       'title' => 'required',  // タイトルは必須
       'content' => 'required', // 内容も必須
]);
This is the pattern you use to implement validation.
<?php

namespace App\Http\Controllers;

use App\Models\Note;
use Illuminate\Http\Request;

class NoteController extends Controller
{
    // メモの一覧を表示するメソッド
    public function index()
    {
        // データベースからすべてのメモを取得
        $notes = Note::all();

        // 'notes.index'ビューを表示し、取得したメモをビューに渡す
        return view('notes.index', compact('notes'));
    }

    // 新しいメモを作成するフォームを表示するメソッド
    public function create()
    {
        // 'notes.create'ビューを表示
        return view('notes.create');
    }

    // 新しいメモを保存するメソッド
    public function store(Request $request)
    {
        // リクエストデータをバリデート
        $request->validate([
            'title' => 'required',  // タイトルは必須
            'content' => 'required', // 内容も必須
        ]);

        // リクエストデータを使って新しいメモを作成
        Note::create($request->all());

        // メモの一覧ページにリダイレクトし、成功メッセージを表示
        return redirect()->route('notes.index')
                        ->with('success', 'Note created successfully.');
    }

    // 特定のメモを表示するメソッド
    public function show(Note $note)
    {
        // 'notes.show'ビューを表示し、特定のメモをビューに渡す
        return view('notes.show', compact('note'));
    }

    // 特定のメモを編集するフォームを表示するメソッド
    public function edit(Note $note)
    {
        // 'notes.edit'ビューを表示し、特定のメモをビューに渡す
        return view('notes.edit', compact('note'));
    }

    // 特定のメモを更新するメソッド
    public function update(Request $request, Note $note)
    {
        // リクエストデータをバリデート
        $request->validate([
            'title' => 'required',  // タイトルは必須
            'content' => 'required', // 内容も必須
        ]);

        // 特定のメモを更新
        $note->update($request->all());

        // メモの一覧ページにリダイレクトし、成功メッセージを表示
        return redirect()->route('notes.index')
                        ->with('success', 'Note updated successfully');
    }

    // 特定のメモを削除するメソッド
    public function destroy(Note $note)
    {
        // 特定のメモを削除
        $note->delete();

        // メモの一覧ページにリダイレクトし、成功メッセージを表示
        return redirect()->route('notes.index')
                        ->with('success', 'Note deleted successfully');
    }
}
Setting Up Routes
Setting up routes
Add the following code to routes/web.php.
<?php

use Illuminate\Support\Facades\Route;
use App\Http\Controllers\NoteController;

Route::get('/', [NoteController::class, 'index']);

Route::resource('notes', NoteController::class);
👁️ VIEW
Creating the Views
The view displays the user interface.
It shows data and accepts user input.
In our memo app, the views are index.blade.php, create.blade.php, edit.blade.php, and show.blade.php.
These views handle the memo list, the create form, the edit form, and the detail view respectively.
First, create layout.blade.php in resources/views.
This defines the shared layout used across every view.
Writing things every page needs — like the header and footer — here makes this file's role easy to understand.
<!DOCTYPE html>
<html>
<head>
    <title>Memo App</title>
</head>
<body>
    @yield('content')
</body>
</html>
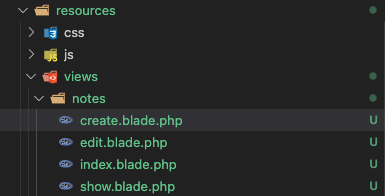
Create a directory called notes inside the Resources/views folder, and create the following files.
- index.blade.php
- create.blade.php
- edit.blade.php
- show.blade.php
index.blade.php
This shows the list of memos, with links to view, edit, and delete each one.
@extends('layout')

@section('content')
    <h1>Notes</h1>
    <a href="{{ route('notes.create') }}">Create a new note</a>
    <ul>
        @foreach ($notes as $note)
            <li>
                <a href="{{ route('notes.show', $note->id) }}">{{ $note->title }}</a>
                <a href="{{ route('notes.edit', $note->id) }}">Edit</a>
                <form action="{{ route('notes.destroy', $note->id) }}" method="POST">
                    @csrf
                    @method('DELETE')
                    <button type="submit">Delete</button>
                </form>
            </li>
        @endforeach
    </ul>
@endsection
🐏 What Does *.blade.php Mean?
Naming a file something.blade.php lets you use Blade, the templating engine Laravel provides.
Blade is a PHP templating engine that makes HTML and PHP easier to read and write.
- @extends('layout') indicates that it extends layout.blade.php.
- Content to insert into the layout is written between @section('content') and @endsection.
- The @foreach loop is used to display each memo in the $notes collection.
- @csrf generates a CSRF token and protects the form submission.
- @method('DELETE') is a Blade directive for using the DELETE method in an HTML form.
🐏 What Is a CSRF Token?
CSRF (Cross-Site Request Forgery) is
an attack where a request the user never intended is sent to a web application.
A CSRF token is a security mechanism used to prevent this kind of attack.
Basically, just writing @csrf whenever you have a POST request should do the trick ()
create.blade.php
This is the memo creation form.
@extends('layout')

@section('content')
    <h1>Create Note</h1>
    <form action="{{ route('notes.store') }}" method="POST">
        @csrf
        <label>Title:</label>
        <input type="text" name="title">
        <label>Content:</label>
        <textarea name="content"></textarea>
        <button type="submit">Create</button>
    </form>
@endsection
edit.blade.php
This is the memo edit form.
@extends('layout')

@section('content')
    <h1>Edit Note</h1>
    <form action="{{ route('notes.update', $note->id) }}" method="POST">
        @csrf
        @method('PUT')
        <label>Title:</label>
        <input type="text" name="title" value="{{ $note->title }}">
        <label>Content:</label>
        <textarea name="content">{{ $note->content }}</textarea>
        <button type="submit">Update</button>
    </form>
@endsection
show.blade.php
This is the memo detail view.
@extends('layout')

@section('content')
    <h1>{{ $note->title }}</h1>
    <p>{{ $note->content }}</p>
    <a href="{{ route('notes.index') }}">Back to Notes</a>
@endsection
And that's it — it's done!
Let's run it and check it out.