❓ What Is This
MVVM is one of the design models used in frontend development.
To get a feel for it, we'll build a simple task-tracker app with React and TypeScript.
This should be approachable even if you're brand new to React with TypeScript.
It should take about 15 minutes.
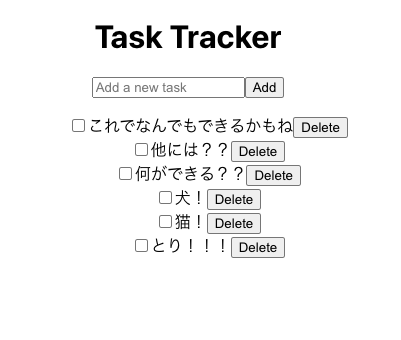
Here's what we'll end up with.
🪴 Environment
Written on Tuesday, July 16, 2024
- Apple M1 MacBook Air
- 14.5 (23F79)
🛠️ How To
MVVM is a software architecture design pattern
aimed at separating an application's logic from its UI.
It's mainly made up of three parts:
- Model: holds the application's data and business logic.
- View: handles the user interface and accepts user input.
- ViewModel: acts as the interface between the View and the Model, handling data binding and UI logic.
None of that probably makes much sense yet.
Let's think it through as we go, by building a simple task-tracker app.
🏃♀️ Creating the Project
Create the project.
yarn create react-app task-tracker --template typescriptMove into the project folder.
cd task-trackerStart it up.
yarn startJust to check, take a look in the browser.
📦 Model
The model defines the application's data structure.
The model handles storing, retrieving, and manipulating data.
We're not using it here, but a model is normally also responsible for
persisting data (e.g., saving it to a database) and
fetching data from external sources (e.g., fetching data from an API).
Create a models folder in the src directory,
and create Task.ts inside it.

export interface Task {
  id: number;
  title: string;
  completed: boolean;
}
🚀 ViewModel
The ViewModel bridges the Model and the View.
It manages the logic for adding tasks, toggling their completed state, and deleting them.
Create TaskViewModel.tsx in the src/models directory
This code defines a hook for managing task state.
The useTaskViewModel hook makes it easy to add tasks, toggle their completed state, and delete them.
import { useState } from 'react';
import { Task } from './Task';

export const useTaskViewModel = () => {
  const [tasks, setTasks] = useState<Task[]>([]);

  const addTask = (title: string) => {
    const newTask: Task = {
      id: Date.now(),
      title,
      completed: false,
    };
    setTasks([...tasks, newTask]);
  };

  const toggleTaskCompletion = (id: number) => {
    setTasks(tasks.map(task =>
      task.id === id ? { ...task, completed: !task.completed } : task
    ));
  };

  const deleteTask = (id: number) => {
    setTasks(tasks.filter(task => task.id !== id));
  };

  return {
    tasks,
    addTask,
    toggleTaskCompletion,
    deleteTask,
  };
};
🐏 If we have Model and View, don't we not need ViewModel?
With just a Model and a View, the code gets messy.
- If the View manipulates the Model directly, logic ends up baked into the View.
The View then stops being a pure presentation layer, which hurts reusability. - Having a ViewModel simply makes testing easier, too — tweaking parameters is much less of a hassle.
👀 View
The View handles the user interface and accepts user interaction.
Here, we'll build the components that display the task list and let you add tasks.
Create TaskList.tsx in the src/components directory
This component displays the task list and handles toggling completion and deleting tasks.
// src/components/TaskList.tsx
import React from 'react';
import { Task } from '../models/Task';

interface TaskListProps {
  tasks: Task[];
  onToggle: (id: number) => void;
  onDelete: (id: number) => void;
}

const TaskList: React.FC<TaskListProps> = ({ tasks, onToggle, onDelete }) => {
  return (
    <ul>
      {tasks.map(task => (
        <li key={task.id}>
          <input
            type="checkbox"
            checked={task.completed}
            onChange={() => onToggle(task.id)}
          />
          {task.title}
          <button onClick={() => onDelete(task.id)}>Delete</button>
        </li>
      ))}
    </ul>
  );
};

export default TaskList;
Create AddTask.tsx in the src/components directory
// src/components/AddTask.tsx
import React, { useState } from 'react';

interface AddTaskProps {
  onAdd: (title: string) => void;
}

const AddTask: React.FC<AddTaskProps> = ({ onAdd }) => {
  const [title, setTitle] = useState('');

  const handleSubmit = (e: React.FormEvent) => {
    e.preventDefault();
    if (title.trim()) {
      onAdd(title);
      setTitle('');
    }
  };

  return (
    <form onSubmit={handleSubmit}>
      <input
        type="text"
        value={title}
        onChange={(e) => setTitle(e.target.value)}
        placeholder="Add a new task"
      />
      <button type="submit">Add</button>
    </form>
  );
};

export default AddTask;
🍳 Wrapping Up
Finally, let's wire these components and the ViewModel together in the App component.
Rewrite App.tsx, the project's base file, as follows.
With this structure, the application's logic (adding tasks, toggling their completed state, deleting them) is concentrated in the ViewModel.
The View can then focus purely on displaying data and receiving user input.
This improves both reusability and testability.
// src/App.tsx
import React from 'react';
import './App.css';
import { useTaskViewModel } from './models/TaskViewModel';
import TaskList from './components/TaskList';
import AddTask from './components/AddTask';

const App: React.FC = () => {
  const { tasks, addTask, toggleTaskCompletion, deleteTask } = useTaskViewModel();

  return (
    <div className="App">
      <h1>Task Tracker</h1>
      <AddTask onAdd={addTask} />
      <TaskList
        tasks={tasks}
        onToggle={toggleTaskCompletion}
        onDelete={deleteTask}
      />
    </div>
  );
};

export default App;
And that's it!
This should be all you need!!